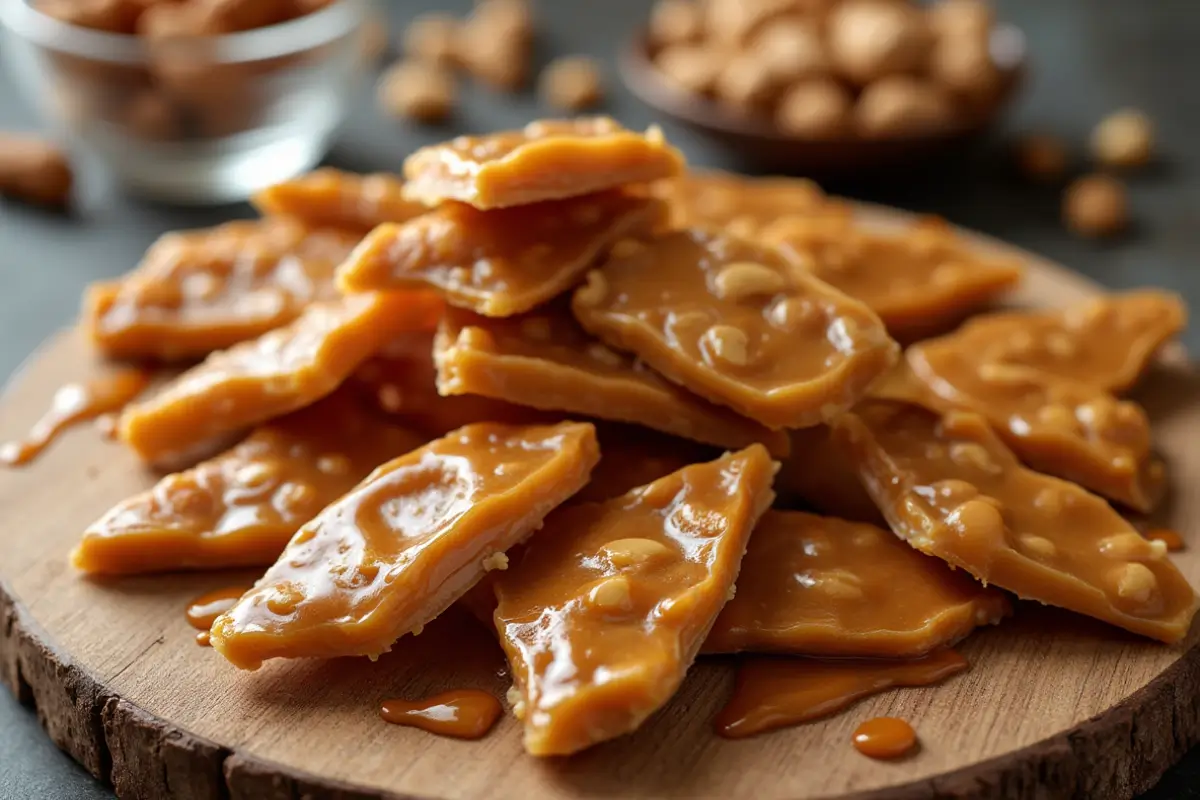
There’s a certain kind of magic that fills the air whenever the scent of caramelized sugar and roasted peanuts wafts from the kitchen. For me, it’s like stepping back in time, instantly transporting me to my grandmother’s cozy kitchen. I remember the rhythmic sound of the brittle cracking into shards as a symphony of happy gatherings and shared laughter filled the space. This isn’t just any candy; it’s a memory captured in a sweet, crunchy bite. This, my friend, is peanut brittle – a simple pleasure that has endured through time, and therefore, I’m excited to share its secrets with you. If you have those same heartwarming memories or are just curious about the craft of making this treat, then you are in the right place, read along!
A Timeless Treat: The History of Peanut Brittle
Peanut brittle’s story is a fascinating blend of simple ingredients and the human desire to create something sweet and satisfying. Although pinning down an exact date of origin is tricky, it’s widely believed to have roots in early American candy-making traditions. Indeed, before fancy confectionery equipment, people experimented with readily available ingredients like sugar and nuts, creating basic forms of what would eventually become peanut brittle.
Early Experimentation with Simple Ingredients
The evolution from these simple sugar candies to the brittle you enjoy today involved refining techniques and discovering new ways to achieve that perfect balance of sweet, salty, and crunchy. It’s a testament to human ingenuity – how a few basic ingredients can transform into a treat that brings so much joy.
A Beloved Treat Through the Years
Over the years, peanut brittle has remained a staple, transcending its humble beginnings to become a beloved treat worldwide, often enjoyed during gatherings, family occasions or just when you crave something delicious. Its enduring popularity speaks volumes about its simple charm and undeniable appeal, making it a timeless classic that you can create at home too.
Peanut Brittle: The Science Behind the Crunch
The magic of peanut brittle isn’t just about the delicious taste, it’s also rooted in some fascinating science. Creating the perfect brittle requires understanding a few key processes that bring its unique texture to life.
The Caramelization Process
First and foremost, there is the process of caramelization, where regular white granulated sugar goes through a transformation under heat. You’ll watch it melt and change from white to a rich, golden brown and its sweetness takes on a complex flavor profile. This stage isn’t just about color, it’s about developing those deep, toasty notes that are crucial to the flavor of your brittle.
Temperature Control and the Sugar’s Transformation in Brittle Recipes
Then we have the temperature control, which is very important. Sugar work demands precision. Too low and your brittle will be soft and chewy, and conversely, too high and your sugar will burn. Using a candy thermometer will help you navigate this process accurately, ensuring that the sugar reaches just the right stage to achieve the ideal brittle texture. The addition of a little water in the beginning of the process is crucial as it helps to facilitate even melting of the sugar. Specifically, the key is to gradually heat the sugar, allowing the water to evaporate slowly, preventing crystallization and facilitating the smooth transformation into a syrup. The exact ratio of sugar to water is important, providing the right consistency for the syrup as it cooks. This delicate balance is essential for achieving the perfect caramel.
The Role of Other Ingredients in Peanut Candy
Furthermore, the addition of butter and salt is vital to the flavor and the texture. Butter adds richness and helps to create a more tender brittle, preventing it from being too hard. Salt, on the other hand, acts as a flavor enhancer, balancing out the intense sweetness of the caramel.
The Magic of Baking Soda in Making Brittle
Finally, the addition of baking soda introduces the perfect texture of your peanut brittle. This is where a simple chemical reaction transforms your caramel from a thick syrup into an airy treat. Baking soda, when introduced to the hot mixture, releases carbon dioxide, creating a light and airy foam-like structure. This foam solidifies as the brittle cools, resulting in that classic crisp and crunchy texture. As a result, this reaction happens rapidly which will require you to quickly pour the mixture on your sheet.
The Maillard Reaction and Flavor Development
Moreover, this process also includes the Maillard reaction, which occurs between amino acids and reducing sugars when heated. It further contributes to the depth of flavor. When sugars and proteins react at high temperatures, it creates those complex, nutty, and toasty flavors that will make your peanut brittle simply irresistible. The Maillard reaction is responsible for the complex flavors that you will only get in a perfectly made peanut brittle.
Crafting the Perfect Peanut Brittle at Home: A Detailed Guide
Now, let’s get to the exciting part: making your own peanut brittle! This recipe is designed to be both user-friendly and effective, helping you achieve that perfect balance of sweet, salty, and crunchy. You can do this!
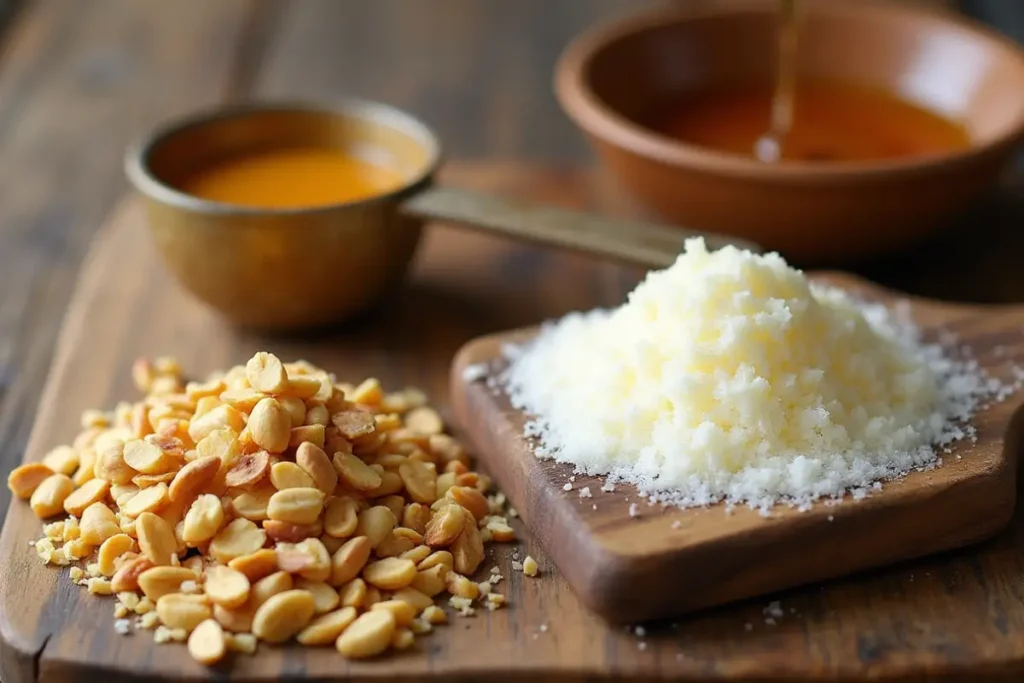
Table 1: Classic Peanut Brittle Ingredients
| Ingredient | Quantity |
| Granulated Sugar | 1 cup |
| Water | 1/2 cup |
| Light Corn Syrup | 1/4 cup |
| Unsalted Butter | 2 tablespoons |
| Salt | 1/4 teaspoon |
| Roasted Peanuts, shelled | 1 1/2 cups |
| Baking Soda | 1 teaspoon |
| Vanilla Extract | 1 teaspoon |
Before You Begin: Safety and Preparation
- Safety First: Working with hot sugar requires caution. Therefore, always use oven mitts and be mindful of the hot syrup. Keep children away from the cooking area to prevent accidental burns.
- Prepare your baking sheet: You will need a large baking sheet. Line it with either a silicone baking mat (Silpat) or parchment paper. Spray it lightly with cooking oil to prevent the brittle from sticking. This will make it much easier to remove the brittle once it has cooled.
- Gather your tools: In addition to your ingredients and baking sheet, have a heavy-bottomed saucepan, a candy thermometer, a heatproof spatula, and measuring cups and spoons ready. Having everything prepped before you start will ensure a smooth process.
Recipe Instructions: Step-by-Step Guide
1. Preparing the Sugar Syrup
- Combine the sugar, water, and corn syrup: First, in your medium saucepan, combine the granulated sugar, water, and light corn syrup. Stir these ingredients together until the sugar is completely dissolved. Indeed, this step is crucial to prevent the sugar from crystallizing.
2. Heating the Mixture
- Heat the mixture: Next, place the saucepan over medium heat. It’s important to use medium heat instead of high heat to avoid scorching the sugar. Attach your candy thermometer to the side of the saucepan, making sure the bulb is submerged in the liquid but not touching the bottom of the pan.
3. Reaching the Hard Crack Stage
- Bring to a boil: Then, continue to cook the mixture without stirring. Watch the sugar closely as it begins to boil. You will start to see bubbles form, and the mixture will begin to thicken. Ultimately, the goal is to reach a temperature of 300°F (149°C), which is the “hard crack” stage. It will take some time, so patience is key in this process.
4. Incorporating Butter and Salt
- Remove from heat and Add butter and salt: Once the thermometer reads 300°F (149°C), immediately remove the saucepan from the heat. Add the unsalted butter and salt. Stir until the butter is completely melted and incorporated. However, be careful, at this stage the mixture is extremely hot.
5. Adding the Peanuts
- Add the peanuts: After that, stir in the roasted peanuts, making sure they are evenly distributed throughout the caramel mixture.
6. Creating the Brittle Texture
- Add baking soda and vanilla extract: Following this, add the baking soda and vanilla extract, and stir vigorously. You will notice that the mixture will foam up rapidly as the baking soda reacts with the caramel. This is normal; therefore, make sure you mix it thoroughly.
7. Pouring and Spreading
- Pour onto the prepared sheet: Immediately, pour the hot mixture onto the prepared baking sheet. It’s crucial to work quickly at this stage as the mixture will begin to harden.
- Spread the mixture: Then, use your heatproof spatula or spoon to spread the brittle as thinly as possible, aiming for an even layer. The thinner the brittle, the crispier it will be.
8. Cooling and Setting
- Cool: Next, allow the brittle to cool completely at room temperature. Do not try to move it or break it before it is fully cooled, otherwise it might be too soft and stick. This process usually takes about 30 minutes.
9. Breaking and Enjoying
- Break into pieces: Finally, once cooled, the brittle will be hard and ready to be broken into pieces. You can break it by hand, or with a knife. Enjoy your homemade peanut brittle!
Tips for Success: Avoiding Common Mistakes
- Temperature is Key: This cannot be emphasized enough. The candy thermometer is your best friend. Make sure your candy thermometer is properly calibrated by boiling water and confirming it reads 212°F (100°C). The accuracy of your temperature reading will determine the final texture of your brittle. The hard crack stage is 300°F (149°C).
- Don’t Stir Too Much: Once the sugar starts boiling, avoid stirring it. Too much stirring can cause the sugar to crystallize, resulting in a grainy brittle.
- Work Quickly: Once you remove the syrup from the heat and add the butter, salt, peanuts, baking soda and vanilla extract, you need to move fast, as the mixture will begin to set very quickly. Have your baking sheet ready and work diligently.
- Use Roasted Peanuts: Pre-roasted peanuts add a depth of flavor to the brittle, compared to raw ones. You can roast raw peanuts in your oven if you prefer, but it is one more step in the process.
- The baking soda is crucial: Do not skip it, you want that classic brittle texture and baking soda is essential for that purpose.
- Spread it evenly: When you pour your mixture onto the baking sheet, make sure you spread it evenly and thinly. If it’s too thick, your brittle may be chewy.
- Let it cool completely: Patience is essential. Let your brittle cool completely before trying to break it into pieces, or it may not come apart as you want it to.
Flavor Variations and Creative Twists on Peanut Brittle
Once you’ve mastered the classic peanut brittle recipe, it’s time to get creative! Here are a few ideas to spice up your brittle:
Exploring Different Nut Options
- Different Nuts: Don’t limit yourself to just peanuts! Instead, try using cashews, almonds, pecans, or even a mixture of different nuts. Each nut has its own unique flavor and texture, which will bring a different dimension to your brittle. Experiment with roasting them for extra flavor.
Adding Spices and Different Sugars
- Spice Additions: A touch of spice can add a delightful complexity to your brittle. For example, consider adding cinnamon, cardamom, or a pinch of chili flakes to the caramel mixture. The combination of sweet and spicy can be irresistible.
- Sugars with a Twist: Try using brown sugar instead of white granulated sugar. It brings a deep molasses flavor that complements the peanuts. You can also experiment with maple syrup but make sure the correct ratio of liquid is kept in the recipe. The possibilities are endless!
Unique Toppings and Finishing Touches
- Toppings: Why stop at nuts? Sprinkle some sea salt, sesame seeds, or even shredded coconut on top of the brittle before it hardens. You can also drizzle melted chocolate after it cools for an extra decadent treat.
List of Flavor Variations:
- Spiced Peanut Brittle: Add a mix of 1/2 teaspoon of ground cinnamon, 1/4 teaspoon of ground nutmeg, and 1/4 teaspoon of ground cardamom to the sugar mixture for a warm and aromatic flavor.
- Maple Pecan Brittle: Replace 1/4 cup of the granulated sugar with maple syrup and use pecans instead of peanuts. The maple flavor adds a nice touch of fall and is the perfect compliment to pecans.
- Sesame Seed Brittle: Sprinkle 2 tablespoons of sesame seeds on top of the brittle just after pouring it onto the baking sheet. Lightly press them down with your spatula before the brittle hardens. The sesame seeds will add a delightful nutty and crunchy texture.
The fun part about brittle is that it invites you to use your imagination. You can try different combinations of ingredients and see which one you like the best!
Storing Your Peanut Brittle to Keep It Fresh
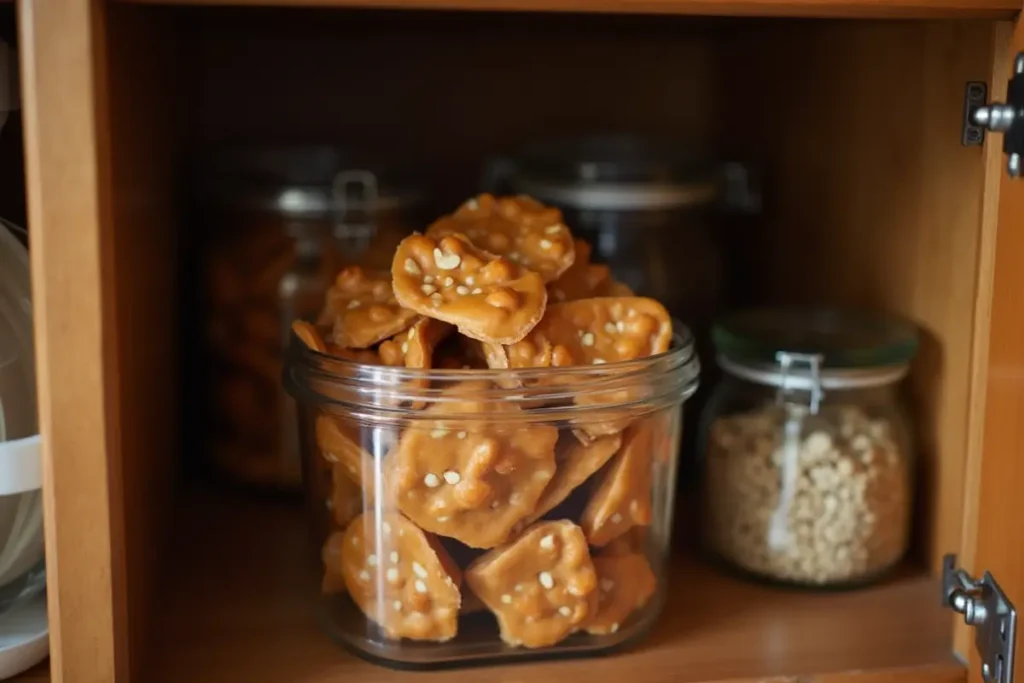
Proper storage is crucial to maintain the texture and flavor of your peanut brittle, preventing it from becoming sticky.
- Airtight Containers: The number one enemy of your brittle is moisture. Therefore, after cooling, store your brittle in an airtight container to protect it from humidity. A jar, a tin, or even a sealable plastic container will work just fine.
- Cool and Dry Place: Keep the container in a cool, dry place, away from direct sunlight and heat. A pantry or a kitchen cupboard is usually the ideal spot. Avoid keeping your brittle in the refrigerator or freezer as it can affect the texture by drawing moisture into it, which will make it sticky.
- Shelf life: If you store it properly, your homemade peanut brittle can last for up to a couple of weeks. However, for the best texture and taste, try to enjoy it within the first week.
What Sides Go With Peanut Brittle?
Peanut brittle is a versatile treat, offering a sweet and nutty crunch that works well on its own or paired with complementary sides. Here are some creative pairing ideas:
1. Creamy Additions
To begin with, peanut brittle pairs wonderfully with creamy accompaniments. For instance, create your own sweet dip using Homemade Heavy Cream for an indulgent snack.
2. Unique Desserts
Adding a unique dessert like Donut Cake can enhance the dining experience. The softness of the cake contrasts beautifully with the brittle’s crunch.
3. Sweet Rice Pairings
For a more unexpected option, incorporate peanut brittle into rice-based desserts. Explore Rice Cooker Meals for inspiration, such as using brittle as a topping for sweet rice puddings.
4. Breakfast Combinations
Peanut brittle can also shine as part of a breakfast spread. Use it as a topping for mini pancakes to add crunch and sweetness. Try the Mini Pancakes Recipe Guide for bite-sized options.
5. Sweet and Savory Insights
For those who enjoy exploring flavor pairings, learn about complementary ingredients with What Is the Difference Between Sweet Potatoes and Yams? to inspire new sweet-savory combinations.
By pairing peanut brittle with these sides and exploring creative uses, you can elevate it into a versatile component of snacks, desserts, or even breakfasts. Let me know if you’d like further adjustments or specific examples!
Frequently Asked Questions About Peanut Brittle (FAQ)
- What is peanut brittle?
- Peanut brittle is a delicious, crunchy confection made from caramelized sugar and roasted peanuts. It’s a classic treat loved for its unique combination of sweet, salty, and nutty flavors and satisfying texture.
- Why is my peanut brittle sticky?
- This is often caused by not cooking the sugar to the correct temperature or from storing it in humid conditions. Ensure you are reaching a hard crack stage (300°F /149°C) and store it in an airtight container with a tight seal. Don’t place it in the fridge, as it might get moist and sticky.
- Can I use salted peanuts instead of unsalted?
- Yes, you can, but you might want to reduce the amount of additional salt you add to the recipe to avoid an overly salty taste. Remember, you can always add more, but you can’t take it out. So start with less, taste, and then add to your liking.
- How can I avoid burning the sugar?
- Use medium heat, stir occasionally until the sugar dissolves, and keep a close eye on the candy thermometer. The temperature should increase gradually, so give it the time it needs.
- Can I make peanut brittle without corn syrup?
- You can, but corn syrup helps to prevent crystallization, which will help you achieve a more professional finish to your brittle. You can try using an alternative liquid sugar, like honey or agave but keep in mind that the texture and taste may vary, and your sugar syrup may crystallize, giving it a grainy consistency.
Conclusion
Peanut brittle is more than just a candy; it’s a tradition, a simple pleasure that can transport you to memories of warmth and joy. The process of making it yourself will be an experience in itself that I hope you can enjoy. Now that you have all the tips and tricks on how to create this delightful treat at home, I hope you’ll be excited to share the experience – and the delicious results – with your family and friends.
I encourage you to try out the classic recipe and experiment with different flavor variations. There are countless ways to customize your brittle. Whether you make it for yourself, for a get-together, or as a gift, peanut brittle is always the perfect treat.
Don’t be afraid to share the love, post on social media, tag a friend and let me know how your brittle turns out!
Now, finally, go forth and embrace the sweet symphony of crunch that is homemade peanut brittle!